Chapter 1 - Retaining Wall
The area next to the storage shed is highest in elevation for the layout. Because the yard slopes down from that point, I will be building a retaining wall next to the patio to have a level area for pond and phase I of the layout.
For some time, I thought about what material to use for a retaining wall. My first choice was to use field stone, piled dry. While this is an easy to build solution, it is also quite espensive. I would need about $900 worth of stone, perhaps more to make the wall. In addition, it would look odd next to the house with it's brick foundation. My second choice was to use the retaining wall blocks, the ones with a tab in the rear to lock onto the course below. This too would be easy to build, but it would also look out of place next to the house. It would also not result in a vertical wall. My third option was to build a brick retaining wall. This would be the most time consuming to build since I would need to mortar many bricks into place, but it would (nearly) match the brick in the existing foundation. I would top it with poured concrete capstones, providing a nice, flat shelf for sitting on as well as other uses.
 I decided on a brick retaining wall. It will be about 27" tall at the patio, low enough that one could see it while sitting down. The wall would have to jog around the train closet door, and would extend out back for about thirty feet.
The brick was delivered on Thursday, 15 June 2000. Three cubes worth, or about 1600 bricks. It took two evenings to move the three tons of bricks to the patio in the backyard.
Sunday, 18 June 2000
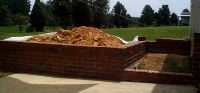
Here are some of photos of the area and the trench for the retaining wall.
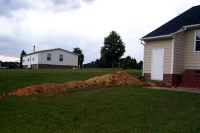
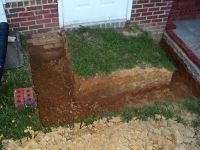

The left photo is of the phase I area, with the trenches for the retaining wall dug. The middle photo is of the trenches around the door to the storage shed. The grass in front of the door will be removed after the retaining wall is built and replaced with a concrete pad. The right photo shows the main trench. The retaining wall parallels the side of the patio, then curves left in a forty foot radius curve.
Thursday, 22 June 2000
 Washed 57 stone, also known as "drainedge" was placed into the bottom of the trench to reduce the amount of concrete needed for the footing.


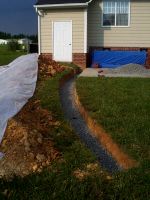
The weather was not cooperating, so to prevent the trench from filling up with water, I covered it with plastic. Welded wire fencing was put atop the trench to support the plastic. I also made a ventilation tunnel to help in the evaporation of any water that findes its way into the trench.
Saturday, 24 June 2000
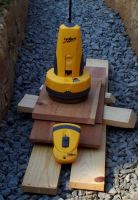


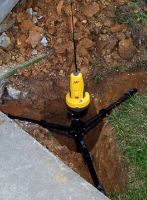
I used my neighbor's Toolz RoboLaser in the trench to mark out the various heights of the footer. The RoboLaser is so simple to use. It is self leveling and can be rotated 360 degrees via a remote. (I can see how useful it would be to level model railroad modules. I've got to buy one!) I used nails placed into the walls of the trench to mark the level of the footer. There is a total of eight levels of the footer. The top level is three courses of brick and mortar higher than the top of the main wall footer. This is because the landing for the shed is about three bricks high. The remaining elevation drops are all one brick in height, hence a bunch of them. The horizontal wooden retainers are 2-5/8" tall, the height of a brick and mortar.
Sunday, 25 June 2000
 Today was spent mixing and pouring thirty five 80 pound bags of concrete for the footing. It was one bag short of a full yard of concrete. Mixing concrete by hand as well as lifting 80 pound bags of concrete 80 times made for a good workout. The June temperatures also meant that I drank several gallons of water to keep hydrated. Here is footer after it has cured for several days. The forms have been removed.
Saturday, 1 July 2000

The RoboLaser is working out very well. Mine has not arrived yet, so I am still using my neighbor's. Amazon.com actually had it for a good price. For laying the brick, it is on the far side of the patio, in a hole dug into an old flowerbed. The hole is required to lower the laser to the level of the first course of bricks that is just at the level of the patio by the train closet. The first layer of brick took somewhat more time to lay than I anticipated. Mainly, it is because I made sure that the brick was in the correct position, since all subsequent courses depend on the first layer. The second and third layers, toward the end of the retaining wall were easier to lay because they were higher, in some cases, above ground level. It made it easier and faster to place those bricks. I also think that the repetition is starting to sink in and I am getting into a rhythm.
Sunday, 2 July 2000


To keep the sun off me while I worked, I erected a couple of tarps that I could move as the sun's position changed. Working in the shade allowed me to roughly double the number of bricks I put down.
Tuesday, 4 July 2000

I used fifteen bags of mortar in about 10 hours of working. That translates into apporximately 330 bricks layed down. I have about that many more to go. Five more courses of brick will need to be mortared onto the wall. Then comes the poured concrete caps.
Saturday, 8 July 2000

Second to last day of brickwork. Three of the final five courses of brick were mortared in.
Sunday, 9 July 2000


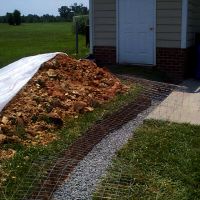
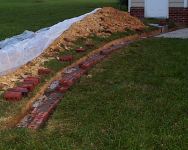
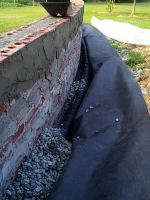
Fifth and final day of laying bricks. I used approximately 1100 bricks, just over two of the three cubes. The leftover bricks will be used elsewhere in the garden railroad, perhaps more retaining walls. Once the brickwork was done, I started on the drainedge system. To prevent frost heave, the wall will be backfilled about a foot with gravel and a drain pipe at the base. The black fabric is to prevent dirt from getting into the drain pipe and clogging it


Thursday, 20 July 2000
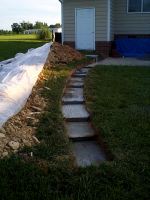
 Final load of gravel for behind retaining wall. Dirt removed from foundation trench used to hold gravel in place, building up the level area for the pond.
Monday, 4 June 2001
I started in on extending the retaining wall to the finished length. I dug the trenches about half of the required depth.
Tuesday, 5 June 2001
To stretch the clay bricks out and to speed up the building of the retaining wall, I picked up enough half width cinder blocks for the non-visable portion of the retaining wall.
Sunday, 10 June 2001
I formed out the upper portion of the retaining wall.
Sunday, 10 June 2001
I formed out the upper portion of the retaining wall.
Monday, 11 June 2001
I finished forming up the bottom section of the retaining wall and poured the foundation for the new section.
Sunday, 24 June 2001
I started laying down the bricks for the remaining section of the upper part of the retaining wall.
Sunday, 24 June 2001
I started laying down the bricks for the bottom section of retaining wall.
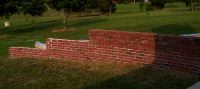
Sunday, 22 July 2001
I finished laying the bricks in the upper section of retaining wall. This included the extra courses on the gradual sections laid last year.
 Last Updated: Sunday, July 23, 2000
©1996 - 2000 James Madill
 I decided on a brick retaining wall. It will be about 27" tall at the patio, low enough that one could see it while sitting down. The wall would have to jog around the train closet door, and would extend out back for about thirty feet.


 Washed 57 stone, also known as "drainedge" was placed into the bottom of the trench to reduce the amount of concrete needed for the footing.


 Today was spent mixing and pouring thirty five 80 pound bags of concrete for the footing. It was one bag short of a full yard of concrete. Mixing concrete by hand as well as lifting 80 pound bags of concrete 80 times made for a good workout. The June temperatures also meant that I drank several gallons of water to keep hydrated. Here is footer after it has cured for several days. The forms have been removed.


 Final load of gravel for behind retaining wall. Dirt removed from foundation trench used to hold gravel in place, building up the level area for the pond.