


Stereo Imaging (revised 27 July 2008)
3d Journal - 3d Gallery
spaceman
air-museum
How to Take 3D Photos:
Stereo, or 3D imaging, requires delivering a slightly different image to each eye. The difference is called parallax. It is the difference in occlusion of more background objects by those in the foreground. The difference is created by the slightly different point-of-view that each eye has, which is about 15 degrees for an object held close to your face. So all you need is a pair of images taken from slightly different points-of-view. About 15 degrees is a good separation. An ordinary camera will do just fine. Take one photograph. Then move to the right or left and take another. For a close-up object, the difference between the left and right camera position should be about the distance between your eyes. For a more distant view, take a step or two between the left and right images. If you're not sure, take several pictures at different separations. For best effect, make sure that your camera is always pointed at the same centered target. Experiment. Special 3D cameras are expensive and unnecessary. The lens spacing is the same as your inter-ocular distance, so they offer no flexibility for close-ups or long-shots.
How to View 3D Photos:
If you have made two images, all that you need to do to view them with full stereoscopic depth is to deliver the left image to the left eye and the right image to the right eye. There are many ways to do that. The methods below require either no equipment (in the case of parallel and crossed stereo pairs) or only red-cyan glasses (which you can usually get free as premiums or purchase with 3D comics). What follows are some examples of these methods. Other methods, not discussed here, make use of polarizers, LCD shutters and comb filters...
|
|
|
How to deliver a different image to each eye...

http://www.povray.org/povzine/povzine2/3d.html
Depthography - Four Stereo
Pairs
http://www.depthography.com/32.html
L  xx
xx
 R
R

Parallel
!!! TRY
THIS AT YOUR OWN RISK !!!
This is the arrangement of stereo pairs on old Stereoview and Stereopticon cards.
Image "L" is to be seen with your left eye and image "R"
with your right eye.
In those cards, the images are no farther apart than your interpupilary distance.
Blur your eyes and look at the smaller pair of images.
Hold two fingers between your eyes and the images
so that your left eye can only see image "L" and your right eye can
only see image "R."
Now focus on the images and they will slowly converge.
R xx
L
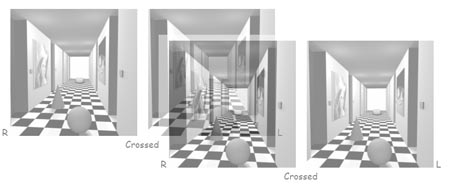
Crossed
!!! TRY
THIS AT YOUR OWN RISK !!!
This is an arrangement of stereo pairs which is much easier to see unaided.
Image "L" is to be seen with your left eye and image "R"
with your right eye.
You can accomplish this with practice if you blur your vision and cross your
eyes
until you see the image pair doubled. If you tilt your head a bit that doubling
will be clear.
Slowly straighten your head and try to make the two closest images of the pair
merge together.
Then try to focus on the merged images.

Red-Cyan Composite Anaglyphs

Mars - Courtesy of NASA
|
Create
a black-and-white Red-Cyan
composite anaglyphic 3D image in Photoshop |
|
| Convert the LEFT and RIGHT
images to grayscale. (this step is included only for clarity since the conversion is automatic) |
BOTH images: Image | Mode | Grayscale |
| Create a new RGB image the same size. |
EITHER image: Select | All |
| Paste the LEFT image into the new Red channel |
LEFT image: Select | All |
| Paste the RIGHT image into the new Green and Blue channels | RIGHT image: Select | All RIGHT image: Edit | Copy NEW image: Channels | Green NEW image: Edit | Paste NEW image: Channels | Blue NEW image: Edit | Paste |
Try it yourself on this stereo pair of the Getty...
 xx
xx
Create a color anaglyph
pair:
Simply paste the Red channel of the left
image into the Red channel of the right
image!
Two solutions are here...

Ground Truth Disparity and
Occlusion
http://www-dbv.cs.uni-bonn.de/stereo_data/

Solar System Live Help
http://www.fourmilab.ch/solar/help/stereo.html
 xx
xx

Richard's Stereo Page
http://www-atm.ucdavis.edu/~grotjahn/Stereo/stereo.html
Eros
Near Earth Rendezvous
Mission
http://near.jhuapl.edu/

Try the movie - Eros, February
12, 2000
http://near.jhuapl.edu/iod/20000217e/feb12v2.mov
The rotation in the movie provides stereoscopic cues.
R  xx
xx L
L
Stereo Pair Extracted from
a Rotation Movie - Eros, December 4, 2000
http://near.jhuapl.edu/iod/20010205/QT_Large.mov
R  xx
xx L
L
Stereo Pair Extracted from
a Rotation Movie - Eros, September 19, 2000
http://near.jhuapl.edu/iod/20001024b/263_3fps.mov
R  xx
xx L
L
Stereo Pair Extracted from
a Rotation Movie - Eros, March 22, 2000
http://near.jhuapl.edu/iod/20000530/small.mov
|
Create
a stereo movie of Eros |
|
| Open two browser windows containing the same movie. | Open one browser window Wait for the movie to load completely Open a second browser window Paste in the URL form the first window |
| Align the two windows carefully side by side. |
Adjust the two windows so they look like the pair of movie windows above |
| Fuse the images with crossed viewing and start the two movies. |
Begin the movie on the LEFT
first. |
| Since this is a movie of a rotating object, the time delay between the left and right images results in different views for each eye. The short delay (less than one second) between the images corresponds to a (10 to 15 degree) difference in viewing angle. Decrease the delay for a narrower viewing angle and less depth. Increase the delay for a wider viewing angle and greater depth. If the delay is too long and the viewing angle is too wide, the images will be so different that you will not be able to fuse the two images. | |